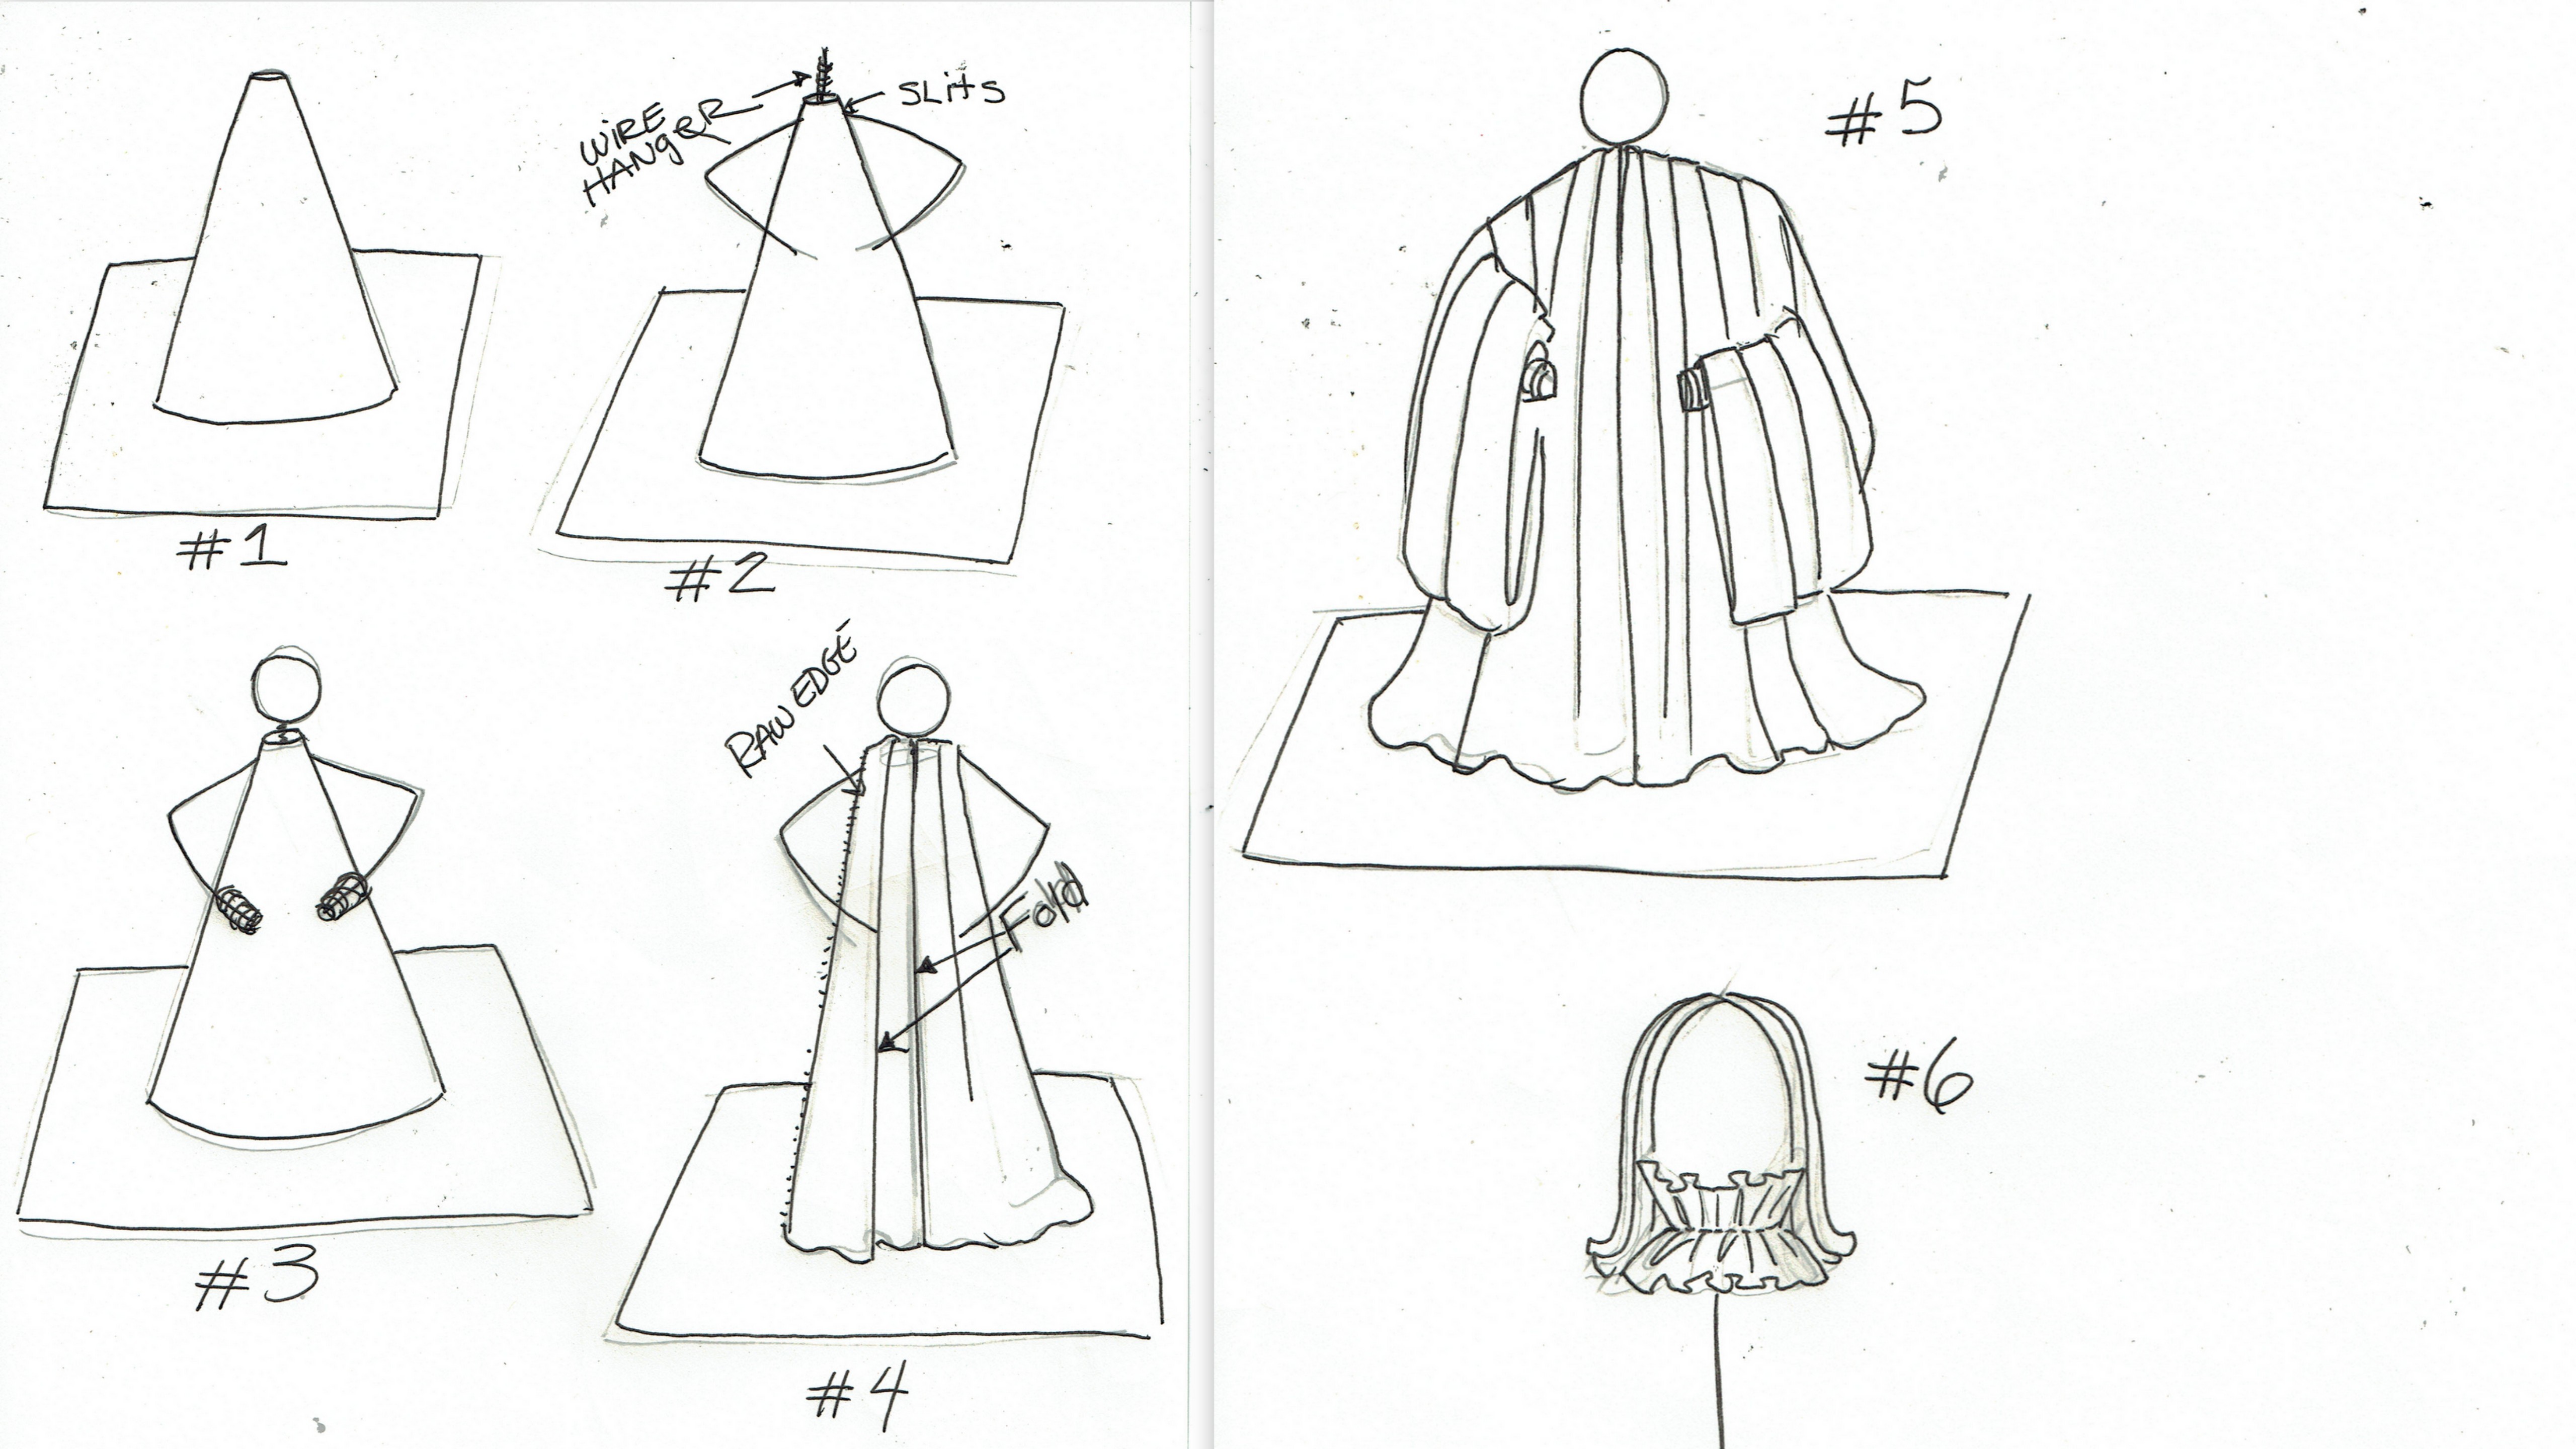
For those of you who are interested in creating your own “Heavenly Choir” here are the step by step instructions and materials needed:
Materials: Oak Tag card board. All art supplies stores have it, and it usually come in big sheets in all different colors….use white. A wire hanger, Styrofoam ball for the head [you can get at any craft store], {it should be in proportion to the cone you will make}], glue [Elmers is good], stapler or tape. an old sheet, thick cord or an old mop, a basin, starch and water, spray paint, scissors, lace, ribbons [things to decorate the choir].
Step #1, cut a large square out of oak tag card board. The size can vary depending on the size of the angel you want to make. You may want to first do this with news paper to get the approx. size so you don’t waste the oak tag. Make a cone out of the square and secure it with either [or both] scotch tape and a few staples to keep it from coming undone. You may have to trim the bottom so the cone sits flat without rocking. Leave a small hole at the top of the cone. When your cone is finished and sits flat, cut two slits approx 1/4 inch on either side of the cone…..Where you taped the cone together should be the back. Next on another piece of square oak tag glue the cone to the square. The square becomes the base. you can also use scotch tape running the strips from the cone onto the base after you have glued it. Don’t worry about being neat it will all be covered up.
Step #2 Get your wire hanger. Cut off the top of the wire hanger leaving just the part that is straight and wrapped with wire [this will become the neck]. Then decide how long you want the arms to be by cutting off the bottom part of the wire hanger leaving just the two top wires of the hanger. Insert the wire hanger into the slits you have made at the top of the cone. Bend the wire hanger “arms” to create elbows. Then decide how long you want the arms to be and cut off the extra wire.
Step #3, Stick your Styrofoam ball into the “Neck” of the wire hanger. You should leave some space between the head and the cone. In other words do not push it so low that the head hits the cone. If you add a lace ruff or some other decoration around the neck you want some room.
Step #3 and #4, in a basin mix your starch. I don’t know how to make this, because my MIL used to do this. She just added the dry starch to the water. She knew the ratio. There are probably instructions on the box of starch. Get your sheet and cut or tare strips of different widths [easier to tare]. If you get a tape measure and measure your form from the bottom then up over the shoulder and down the back plus extra to create a pretty bottom of the dress [look at to photos] you will get a good idea of the length of the strips. You will need enough length to fold under the hem of the dress to create a nice edge…..NO RAW edges of the strips should show. The strips will be fold so the fold edge is the edge that shows. You do not want the frayed raw edges to ever show. One strip will be layered over the other. For a dry run you can take some of the dry strips and drape them over your form to get an idea of the length you will want. This is IMPORTANT….you will want extra length to fold under at the hem of the dress so again you have smooth edges [look at photo]. You may even want the back of the gown to be longer than the front to create a train. When you have decided on the length of the strips [better longer than too short] you are ready to begin. Remember the strip must go from the bottom up over the shoulder and down the back so the stripes have to be pretty long….You are ready to begin the draping of the choir robe……..Dip the strip into the starch. Let the strip run between your finger removing the excess liquid. For the first piece on either side of the front fold both of the long sides of the strip under, creating a nice smooth fold, and place it at the neck of the figure so the strip goes down the front and back of the figure. Your fold under should be approx one 1 inch. Work each side together from the center out. You will have to slide the second layer under the first to cover the raw edge. Leave the extra length at the bottom laying out straight…..do not fold under until all of the dress is draped. Make sure you over lap the pieces in the center front so no cardboard shows, and continuously under lap the strips showing only the clean folded edge as you create the dress. This is the time to be creative with the drapes of the dress. The more drapes you have the prettier it will look when it’s dry and stiff. The strips do not have to be even in width. The irregularity looks pretty. Leave yourself enough width to each strip to be able to drape it nicely. Again you don’t have to be exact as long as all the frayed raw edges are covered. When you get to the sides you will need to over lap the front strip over the back. There is no science to this just make it look pretty.
Step #5, When you get the dress finished it’s time to start the sleeves. Again, you will need strips………..FIRST….for the hands cut a very narrow small strip, about 4 inches long….maybe a little longer to be safe.. Dip it in the starch and get rid of the excess liquid between your fingers. Start just below where you made the bend for the elbow. Start wrapping the strip around the wire, once is enough until you get to the hand and keep wrapping the strip around until it is thick enough to look like a hand. Try to cover the end of the hand with the strip so it looks smooth and continue wrapping up the arm again finishing where you started. Cut the excess strip off. With your fingers just smooth the strip onto the first layer of fabric and they will dry together. Always use your fingers to get the cloth to look as you would like. It will dry the way you manipulate it. Squeeze the tip of the hand to make a pleasing shape. The sleeve will cover most of the hand so don’t worry about it too much. Now we are ready for the sleeves. Cut a long stripe….this will be the entire sleeve!!!!….First fold in one of the long edges of the strip approx. 1 3/4 inches to 2 inches. This folded edge will be the edge of each fold that shows. Starting at the bottom section of the arm drape the the strip leaving a overhang of fabric on the wire about 3/8 ths of an inch. Bring the strip down under the “arm”, and then up and over creating a hanging drape or loop, then cover the beginning of the sleeve [the raw edge 3/8ths overhang] where you started. You should not see the the 3/8ths inch of the beginning of the sleeve. With your fingers you can press that 3/8ths inch to the piece of the sleeve that is covering it. Because they are wet they will stick together. How deep you make the loop or drape is up to you. You can vary this on different figures. Continue wrapping the strip around the arm making each “loop” longer as you go up [look at photo]. REMEMBER keep the folded edge showing and cover the raw edge of the strip with each loop. They don’t have to be perfect! When you get to the shoulder this is the tricky part! Fold in the raw edge of the stripe. Wrap the sleeve twice and end the strip on the side facing the body. Press the wet fabric together with your fingers so they dry that way….like glue. You can even use some glue if you think it’s necessary. You may have to take the closest fold of THE DRESS near to the sleeve and overlap the sleeve with the dress in case the top of the sleeve looks strange. Remember, there is no right or wrong way of doing this…..you make it up as you go along….Each LOOP OF THE SLEEVE SHOULD BE LONGER as you get to the top. The difference in the lengths is up to you………….When you have completed all of the gown, with your fingers create interesting drapes to the strips. This will give the gown character when it is dried and spray painted. Next……the hem. Fold under the fabric all around the bottom to create a nice edge, scrunching as you go along, again to create interest. As I said before you can have the back longer than the front as a train, but you always want at the very least 1 1/2 inches to lay and splay on the square cardboard base. I usually have more……You are now finished with the gown.
Step #6 The hair and decorations. For the hair we used an old mop. Cut long strands of the mop cord and separate them. Some mops have many cord wrapped together. You want a single cord. Again, dip the cord in the starch and start creating a hair style. You can loop the cord and use the two raw edge as the center part. Start at the front of the head of both sides and work to the back. Cut the cords and use the two raw edges to create a different hair style. We have used glue to fix the cords to the head….or even a glue gun. What every works. I have made braids out of string and used them to cover raw edges or wrap around the head Victorian style……Again, there are no rules on what materials you use for the hair or how you do it. This is just the way we did it. My MIL had a basket of odds and ends. Scraps of lace and ribbon which we used as all kinds of collars and cuffs coming out of the sleeves. I used one very think ribbon as a head band with a bow. For another figure I took a strip of narrow lace and shirred down the middle with a needle and thread and made a ruff collar just sewing it together at the back. My MIL shirred a long piece of lace and glued it down the front of the gown. She took a small narrow piece of lace and made a crown and glued it to the top of the head…….You can do your own thing…..For instance…….all craft stores sell flat back stones either multi color or all one color like clear crystal……After the figure is completely dry and stiff, and you cut away the excess cardboard and spray paint it, getting into all the nooks and crannies. You can use any color paint you want….Silver or Gold look the best…… Make sure you spray paint up and into the loops and folds of the sleeves, [no white sheet should be seen!] When it is dry spray paint the bottom of the card board. You may have to spray paint the figure twice due to the sheeting absorbing the color. When you have sprayed it once, and waited for it to dry, the second coat stays on top of the first coat and shows the color better….. Then you can glue the stones or whatever other embellishments…………Important note……when the figure is complete and dried, before spray painting……cut away the excess cardboard base following the shape of the hem…..cut so when you put the figure down you can’t see any of the cardboard base showing from under the gown….look at photo………Now you have your own Heavenly Choir for years to come!…………………enjoy………Happy Holidays……………….much love………………Louis
Thank you for this wonderful Christmas present which will be shared with family and friends. Head off to a thrift store for suitable used sheets or other similar fabric to repurpose.
Your choruses will be heard far and wide. All the best in the new year.
How kind of you to share this process with us! I barely have time to brush my TEETH at this point in the countdown, but would love to try this at a less frantic moment. They so combine the look of elegance with simplicity, but clearly were not THAT simple to create, which is the trick with elegant simplicity. Thank you.
Beautiful ! Thank you for sharing this.
Merry Christmas and may these angles bless you every day
Okay. Thanks for the tip.
R.
Dear Louis,
I am fascinated by this process. I have saved your photos and written instructions and look forward to giving this a try. I have some antique lace that would look lovely as trim. I do think that you had a special knack with draping the fabric to look so beautiful! But it will be fun for a mere amateur to make some angels too.
Thank you for taking the time to share all this.
Merry Christmas.
With love and peace to you and yours,
Ruth
Dear Ruth…the trick is to make the strips wide enough to give you the fabric for draping. You will be surprised how good they look after they are spray painted!
Your choir is so lovely. I’m getting inspired. Gold spray paint hides any number of flaws, just saying! Also, liquid starch is good for this project, but there is also fabric stiffener available in craft stores with loads of instructions. Also, some spray paints “eat” styrofoam. If you use Design Master (made for florals) you won’t have that problem. Design Master makes several colors of gold spray.
I tried to see if we covered the styrofoam balls with narrow strips of the sheeting but I couldn’t tell. It’s been so long ago. My MIL had the Styrofoam balls so i don’t know if they were special. I had thought she got them in Michael’s or a store like that.